It's Gemini Birthday Season, which means this little gemmi is turning ** years old. My career keeps getting better and better, but i seem to be making less and less money - go figure. Luckily, thanks to giftgivers who know me best (aka boyfriend) my raw kitchen is continuing to grow. Still a week out from Bday and prezzie numero uno has already arrived...the excalibur dehydrator. For those of you newer to raw foods, this is the cadillac of dehydrators. My old one was round, stacked, and had a big fan hole in the center making it impossible to make big round wraps, breads, and crusts. Today my raw-ventures have expanded and i'm welcoming a whole new realm of raw-ssibilities.
In an effort to keep things simple, my first attempt at Pizza Crust was with Zucchini. I figured it would be pretty hard to screw up a one ingredient recipe (though i wouldn't put it past me to). Luckily it turned out good. I made half the amount below, and using the technique i did, it only yielded two crusts...not nearly enough for the amount of time spent waiting for dehydrating to finish. I would definitely make more next time (so i doubled the recipe for you below)...you might even go big and add another 8 cups of zucchini as these nests go quick!
You'll need: Food Processor with grating disc and a dehydrator
Ingredients: 16 cups (+ a few extra cups)* shredded zucchini and Italian seasonings (Makes 4-8, 5 inch crusts)
I'm not really sure how many zucchinis this is. I make a lot of zucchini noodles and save the remainder (seeded center) to make hummus, so i used those to make this crust.
In a large bowl mix your shredded zucchini with the italian seasonings.
 Put liners on your dehydrator trays. Scoop 2 cups of shredded zucchini into a mound in one corner and another two cups in the opposite corner. (You may have to put 4 nests, rather than two, on one tray to fit it all in). Squeeze each individual mound firmly together and then press down to form a crust. Middle should be about an inch thick, edges slightly higher about 1 1/4 inch.
 *Make sure you have quite a few extra cups of shredded zucchini. Half way through drying, your crusts will be somewhat dry but will have big holes. You can either peel off a crust on one corner and stack it on the one in the other corner covering the holes, then fill any weak areas or holes with a little of the extra shredded zucchini (if you use this technique you will end with 4 crusts). Alternately, you can fill your holes with the extra shredded zucchini and continue to dry checking for holes occasionally, repairing as necessary (this technique will yield you 8 crusts, but be warned you will need LOTS of extra shredded zucchini to patch with). I used the first technique yielding less nests, but after checking the nests at 10 hours i didn't have enough zucchini shreds to patch the amount of divits my nests had.
Set your dehydrator at 126 degrees for the first 2 hours then turn down to 105 degrees and dry for another 18-24 hours or until fully dry and crisp. Allow to cool and store in an airtight container until ready to use.
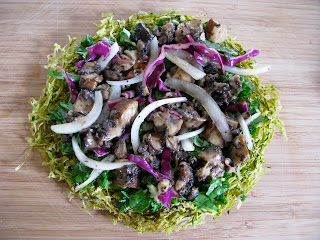
Pick your toppings. I chopped basil in the food processor (using the S blade) with a clove of garlic and a hit of sea salt and lemon juice. This was my first layer on the nest. I then chopped a portobella mushroom and took a few slices of onion and purple cabbage and massaged them well with a splash of lemon, olive oil, tamari, and sea salt. After a minute of massage i topped my pizza with the veggie mixture and popped it back in the dehydrator to re-crisp the zucchini nest and heat the toppings. And there you have it - RAW PIZZA!!! MMMMMMMMMMM


No comments
Post a Comment